
Most black marks on vinyl are rubber transfer sitting on the surface, not permanent damage, so you can usually remove them without harsh products. Start with a clean, dry microfiber cloth, then move to a barely damp one with a pH-neutral vinyl cleaner if the mark stays. If a fingernail catches in the mark or nothing transfers to the cloth, stop and get the floor assessed.
TL;DR:
If black pigment transfers to a white microfiber cloth, the mark is surface residue; a fingernail catching in it signals wear layer damage.
Remove grit first, then use a dry microfiber cloth and a barely damp cloth with neutral pH vinyl cleaner; stop if haze or dulling appears.
Use 70% isopropyl alcohol only for stubborn residue when the flooring manufacturer permits it, then rinse and dry immediately after testing a hidden spot.
Entrance mats can block up to 80% of tracked debris; pair them with daily sweeping, weekly damp mopping, and felt pads under furniture.
Call a flooring professional if the mark survives the gentle cleaning sequence, the finish looks cloudy, or the floor remains under warranty.
Table of Contents
-
What maintenance schedule works for busy homes and commercial spaces?
-
Professional vinyl cleaning and polishing for stubborn scuffs
Why black scuffs appear on vinyl floors
A black streak is almost always a deposit, and what deposited it decides whether it will come off. Knowing the source saves you from scrubbing a mark that no cleaner can lift.
-
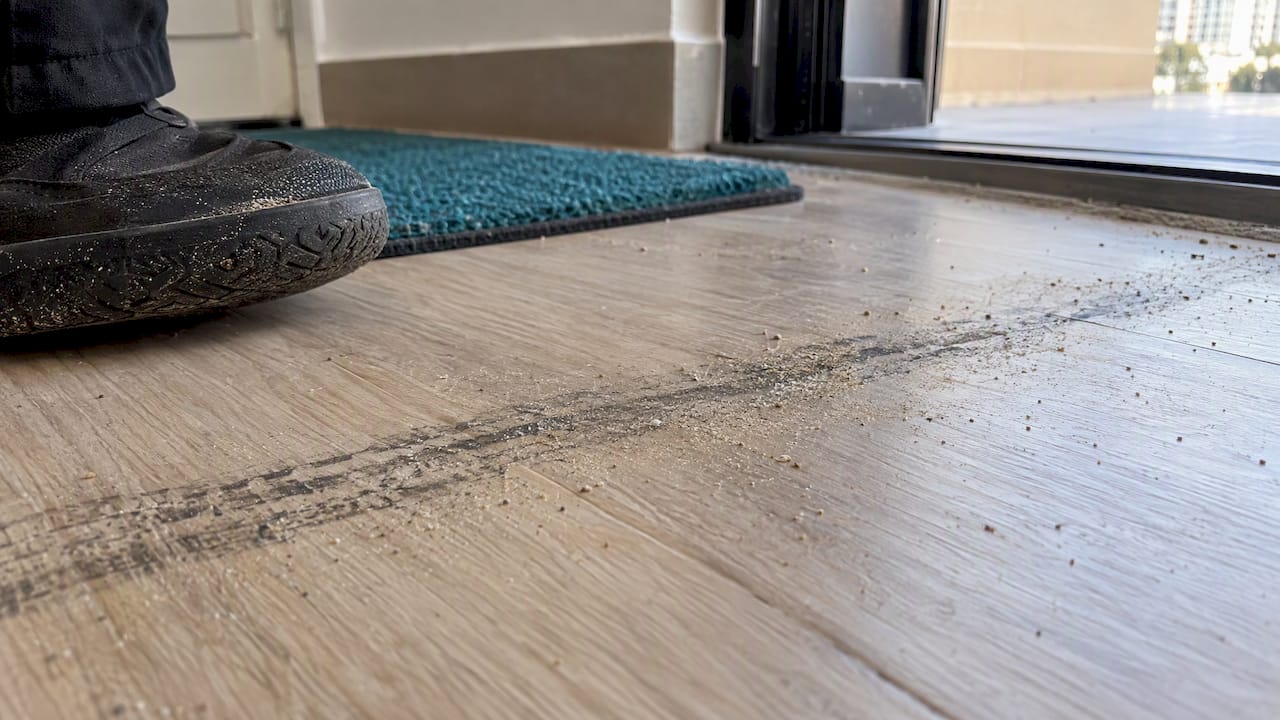
Rubber transfer: shoe soles, chair tips, caster wheels, appliance feet and trolley wheels leave black streaks that sit on top of the finish.
-
Tracked-in grit: sand and fine debris act like sandpaper under foot traffic, turning a light streak into a dulled, scratched patch over time.
-
Rubber-backed mats and adhesives: these can stain the vinyl itself, leaving a yellow or dark discoloration under the surface that cleaning will not remove.
-
Gouges and deep scratches: a mark that catches your fingernail is damage to the protective wear layer, not residue.
The first two causes are the ones you can fix with patience. The last two need a different approach, and the next section shows how to tell the difference.
How can you tell removable transfer from real damage?
Run these checks before you reach for any product. They cost nothing and protect the finish.
-
Wipe the mark with a clean white microfiber cloth. If black pigment lifts onto the cloth, it is transfer and almost certainly removable.
-
Try a barely damp microfiber with a pH-neutral vinyl cleaner. Keep water away from seams and edges.
-
Drag a fingernail lightly across the mark. If it catches in a groove, the wear layer is probably gouged, and cleaning will not restore it.
-
Test any new product in a hidden spot, such as under a sofa or inside a closet, and look at the result once it dries.
Pro Tip: Watch for hazing, a cloudy patch or whitened edges while you test. Those are signs the finish is reacting, so stop right there and do not escalate.
If you are unsure whether a mark is a scuff or a scratch, our guide on telling vinyl scratches from scuffs walks through a quick decision process.
Step-by-step removal: start gentle, escalate carefully
Work through these steps in order and stop as soon as the mark is gone. Each step is slightly more aggressive than the last, which keeps the risk to the finish low.
-
Remove grit first. Vacuum or sweep the area. Rubbing over loose particles grinds them into the wear layer and creates the very scratches you are trying to avoid.
-
Dry microfiber. Use light pressure and work with the grain or plank direction. Light transfer often disappears at this stage.
-
Damp microfiber with a pH-neutral vinyl cleaner. Wring the cloth until it is barely damp, avoid pooling near seams, then rinse and dry the spot.
-
Tennis ball or a plain white eraser. A clean tennis ball pressed and rolled over the mark, or a white eraser used with light, controlled friction, lifts transfer that resists wet cleaning. Skip colored erasers and steel wool.
-
Melamine foam, lightly dampened and wrung out. This is a micro-abrasive, so use it sparingly and test it first on glossy finishes, where it can leave a dull spot.
-
Isopropyl alcohol, 70%, on a cloth. Use a small amount on stubborn residue only if your flooring manufacturer’s care instructions allow it, then rinse and dry immediately.
Household options such as a baking soda paste or plain, non-gel white toothpaste can lift marks, but both are mildly abrasive. Test them in a hidden spot and use them only on matte or textured finishes.
Pro Tip: Acetone, bleach, lacquer thinner, citrus cleaners and abrasive scrub pads can strip or warp the protective layer. A stronger product is rarely the answer to a stubborn mark.
Set one firm stop rule: any dulling, haze, color change or change in texture means you stop. At that point, more effort costs you more than the mark ever did.
How do you prevent scuffs from coming back?
Prevention comes down to controlling grit and rubber contact. A few cheap habits do most of the work.
-
Use two mats at every entrance: a scraper mat outside and an absorbent mat inside trap grit before it reaches the floor.
-
Fit felt pads on furniture and appliance feet: replace them once they compress, and swap black rubber tips for non-marking versions.
-
Choose the right chair mat: polycarbonate or other non-staining mats suit rolling chairs, while soft PVC and rubber-backed mats can discolor vinyl.
-
Keep a simple routine: sweep or vacuum daily, damp-mop weekly with a vinyl-approved pH-neutral cleaner, and wipe fresh transfer promptly.
-
Plan periodic maintenance: in busy commercial settings, scheduled burnishing or manufacturer-recommended upkeep helps harden the surface and cut scuff susceptibility.
Entrance matting can stop up to 80% of the debris that would otherwise be tracked onto your vinyl, which is why it is the cheapest scuff protection you can buy. For a fuller routine, see our vinyl floor care tips.
When does DIY risk more harm than good?
Some marks are beyond a cloth and a cleaner. Calling a professional early often costs less than repairing a floor that has been scrubbed past saving.
-
A fingernail catches in the mark, which points to wear-layer damage.
-
The mark survives the full cleaning sequence above.
-
The finish looks cloudy or dull in patches rather than carrying a surface deposit.
-
The floor is high-value or still under warranty.
A professional checks the condition of the wear layer, uses low-moisture or manufacturer-approved restoration methods, and tells you honestly whether a repair or plank replacement makes sense. That assessment also protects warranty terms, since a well-meant homeowner fix can cause permanent finish loss. If you are weighing the options, our comparison of DIY versus hiring a pro for vinyl polishing covers the trade-offs.
How do heat and sand make scuffs worse in Dubai?
Local conditions change how fast a scuff forms and how stubborn it becomes. Fine desert sand is the main culprit: it blows in, settles on balconies and entrances, and rides in on shoe soles. Once it is on the floor, every footstep grinds it against the finish, so light rubber transfer turns into a dull, scratched streak much faster than in a dust-free home.
Heat adds a second problem. Floors near large windows, glass doors and sun-facing rooms warm up, and a warmer surface can hold rubber transfer more firmly, which makes marks harder to wipe away if you leave them for days. Rooms that swing between cool air conditioning and hot sunlit patches put steady stress on the surface too.
The practical response is to be stricter about the basics. Use heavy-duty entrance matting, keep a shoe-free zone where you can, vacuum before you damp-mop, and wipe fresh marks the same day. In villas with sandy terraces and apartments with high foot traffic, grit control matters more than any cleaning product you own.

What maintenance schedule works for busy homes and commercial spaces?
A schedule beats a rescue. The right rhythm depends on how many people walk across the floor each day.
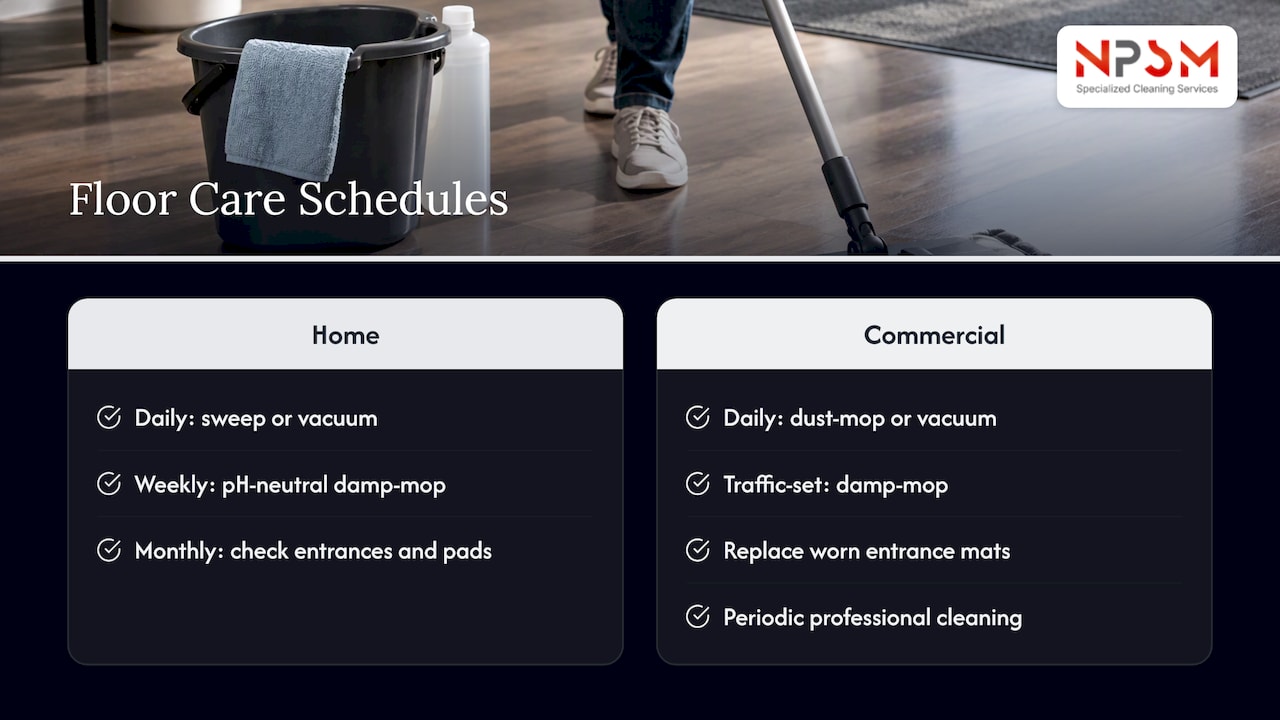
For a home, sweep or vacuum daily, damp-mop weekly with a pH-neutral vinyl cleaner, and check entrances and furniture pads monthly. Villas with outdoor access or pets may need the vacuum more often, because sand returns quickly.
For commercial spaces such as offices, shops, clinics and hotel corridors, add structure with professional commercial cleaning services. Dust-mop or vacuum at least daily, damp-mop on a set cycle matched to traffic, and replace worn entrance mats before they stop trapping grit. Schedule periodic professional cleaning and polishing so the surface keeps a uniform sheen instead of wearing in lanes. Avoid applying site wax or mop-and-shine products on floors with a factory-applied urethane layer, since they can form a cloudy, tacky film that attracts dirt and may need professional stripping.
If you manage several rooms or a whole building, we can set up a recurring plan around your traffic pattern. Our vinyl polishing and cleaning service covers both homes and commercial sites.
Why gentle, ordered cleaning protects your floor
The most expensive vinyl problem I see is not the original scuff, it is the dull patch someone creates while trying to remove it. A strict hierarchy, gentlest method first, keeps you from swapping a removable streak for permanent haze. Most marks give way to prompt, light action, and aggressive scrubbing is rarely needed. On a high-value floor, a short professional assessment can also save the cost of replacing planks too early.
— Qadir
Professional vinyl cleaning and polishing for stubborn scuffs
When marks persist, the finish looks damaged or your warranty calls for professional care, we are the next step. We assess the wear layer, follow safe cleaning protocols and work to restore a uniform look on vinyl floors in homes and high-traffic commercial spaces. Booking a visit early can help you decide what care your floor needs. Explore our vinyl floor cleaning and polishing service and request an assessment today.
FAQ
How do I remove black scuff marks from vinyl flooring?
Start by removing loose grit, then wipe with a dry microfiber cloth. If the mark remains, use a barely damp cloth with a pH-neutral vinyl cleaner, then a tennis ball or white eraser. Stop at the first sign of dulling.
Can I use isopropyl alcohol on vinyl floors?
A small amount of 70% isopropyl alcohol on a cloth can lift stubborn residue, but only if your manufacturer’s care instructions allow it. Rinse and dry the spot straight away, and test somewhere hidden first.
How do I know if a scuff is damage instead of a removable mark?
Drag a fingernail across it. If the nail catches, the wear layer is likely gouged and cleaning will not fix it. A mark that lifts onto a white cloth is transfer and is usually removable.
What stops black marks from returning on vinyl?
Control grit and rubber contact. Use matting at entrances, felt pads under furniture, non-marking caster tips and non-staining chair mats, and sweep or vacuum daily.